Cucumber学习笔记
# Cucumber
Cucumber (opens new window) is a testing framework that supports behavior-driven development (opens new window) and allows you to write features and scenarios in a human-readable language.
Cucumber是一个用于行为驱动开发behavior-driven development(BDD)的自动化测试工具,用Ruby编写,使用自然语言来描述测试用例,使得非研发(QA、PM)也可以理解甚至编写测试用例。
# Gherkin
Gherkin is a set of grammar rules that makes plain text structured enough for Cucumber to understand.
Gherkin 是 Cucumber 用来描述 测试用例 的语言,以下为关键字的用意与关联关系。

# Step Definitions
Step definitions connect Gherkin steps to programming code.
# Keywords
The primary keywords are:
Feature(opens new window)Rule(opens new window) (as of Gherkin 6)Example(opens new window) (orScenario)Given(opens new window),When(opens new window),Then(opens new window),And(opens new window),But(opens new window) for steps (or*(opens new window))Background(opens new window)Scenario Outline(opens new window) ( orScenario Template(opens new window))Examples(opens new window) ( orScenarios(opens new window))
There are a few secondary keywords as well:
"""(Doc Strings)|(Data Tables)@(Tags)#(Comments)
# Feature
The purpose of the Feature keyword is to provide a high-level description of a software feature,
and to group related scenarios.
The first primary keyword in a Gherkin document must always be Feature, followed by a : and a
short text that describes the feature.
You can add free-form text underneath Feature to add more description.
These description lines are ignored by Cucumber at runtime, but are available for reporting (they are included by reporting tools like the official HTML formatter).
Free-form descriptions (as described above for Feature) can also be placed
underneath Example/Scenario, Background, Scenario Outline and Rule.
You can write anything you like, as long as no line starts with a keyword.
Descriptions can be in the form of Markdown - formatters including the official HTML formatter support this.
# Rule
The (optional) Rule keyword has been part of Gherkin since v6.
The purpose of the Rule keyword is to represent one business rule that should be implemented. It
provides additional information for a feature. A Rule is used to group together several scenarios
that belong to this business rule. A Rule should contain one or more scenarios that illustrate
the particular rule.
# Example (or Scenario)
This is a concrete example that illustrates a business rule. It consists of a list of steps (opens new window).
The keyword Scenario is a synonym of the keyword Example.
You can have as many steps as you like, but we recommend 3-5 steps per example. Having too many steps will cause the example to lose its expressive power as a specification and documentation.
In addition to being a specification and documentation, an example is also a test. As a whole, your examples are an executable specification of the system.
Examples follow this same pattern:
- Describe an initial context (
Givensteps) - Describe an event (
Whensteps) - Describe an expected outcome (
Thensteps)
# Steps
Each step starts with Given, When, Then, And, or But.
Cucumber executes each step in a scenario one at a time, in the sequence you’ve written them in. When Cucumber tries to execute a step, it looks for a matching step definition to execute.
Keywords are not taken into account when looking for a step definition. This means you cannot have
a Given, When, Then, And or But step with the same text as another step.
# Background
Occasionally you’ll find yourself repeating the same Given steps in all of the scenarios in
a Feature.
Since it is repeated in every scenario, this is an indication that those steps are not essential
to describe the scenarios; they are incidental details. You can literally move such Given steps
to the background, by grouping them under a Background section.
A Background allows you to add some context to the scenarios that follow it. It can contain one or
more Given steps, which are run before each scenario, but after
any Before hooks (opens new window).
A Background is placed before the first Scenario/Example, at the same level of indentation.
# Scenario Outline
The Scenario Outline keyword can be used to run the same Scenario multiple times, with different
combinations of values.
The keyword Scenario Template is a synonym of the keyword Scenario Outline.
# Step Arguments
# Cucumber Expressions
Cucumber supports both Cucumber Expressions (opens new window) and Regular Expressionsfor defining Step Definitions (opens new window), but you cannot mix Cucumber Expression syntax with Regular Expression syntax in the same expression.
Cucumber 支持在 Java 注解 中使用 {类型} 作为占位符。
在 Step 中直接写上参数,将在 Java 代码中,会把占位符对应的参数作为方法参数传递进去。
注解中声明占位符的顺序为注入方法参数的顺序。
字串类型的关键字,需要加上单引号或 双引号 作为声明。
| 类型 | 正则 | 说明 |
|---|---|---|
| {byte} | (/\d+/) (/[0-9]+/) | Matches the same as {int}, but converts to an 8 bit signed integer if the platform supports it. |
| {short} | (/\d+/) (/[0-9]+/) | Matches the same as {int}, but converts to a 16 bit signed integer if the platform supports it. |
| {int} | (/\d+/) (/[0-9]+/) | Matches integers |
| {long} | (/\d+/) (/[0-9]+/) | Matches the same as {int}, but converts to a 64 bit signed integer if the platform supports it. |
| {float} | (/-?\d+.\d+/) (/-?[0-9]+.[0-9]+/) | Matches floats |
| {double} | (/-?\d+.\d+/) (/-?[0-9]+.[0-9]+/) | Matches the same as {float}, but converts to a 64 bit float if the platform supports it. |
| {biginteger} | (/\d+/) (/[0-9]+/) | Matches the same as {int}, but converts to a BigInteger if the platform supports it. |
| {bigdecimal} | (/-?\d+.\d+/) (/-?[0-9]+.[0-9]+/) | Matches the same as {float}, but converts to a BigDecimal if the platform supports it. |
| {string} | (/".*"/) | Matches single-quoted or double-quoted strings. Only the text between the quotes will be extracted. The quotes themselves are discarded. Empty pairs of quotes are valid and will be matched and passed to step code as empty strings. |
| {word} | (/\S+/) | Matches words without whitespace |
{} | (/.*/) | Anonymous, Matches anything (/.*/). |
# Hook
Hook:钩子方法
| 注解 | 执行时机 |
|---|---|
| @BeforeAll | 在启动 Cucumber 时执行 |
| @Before | 在所有 Scenario 执行之前执行 |
| @BeforeStep | 在所有 Step 执行之前执行 |
| @AfterStep | 在所有 Step 执行之后执行 |
| @After | 在所有 Scenario 执行之后执行 |
| @AfterAll | 在结束 Cucumber 时执行 |
# IDEA cucumber support
To be able to use Cucumber in your application, make sure that the necessary plugins are enabled and add the Cucumber library to your project.
# Enable plugins
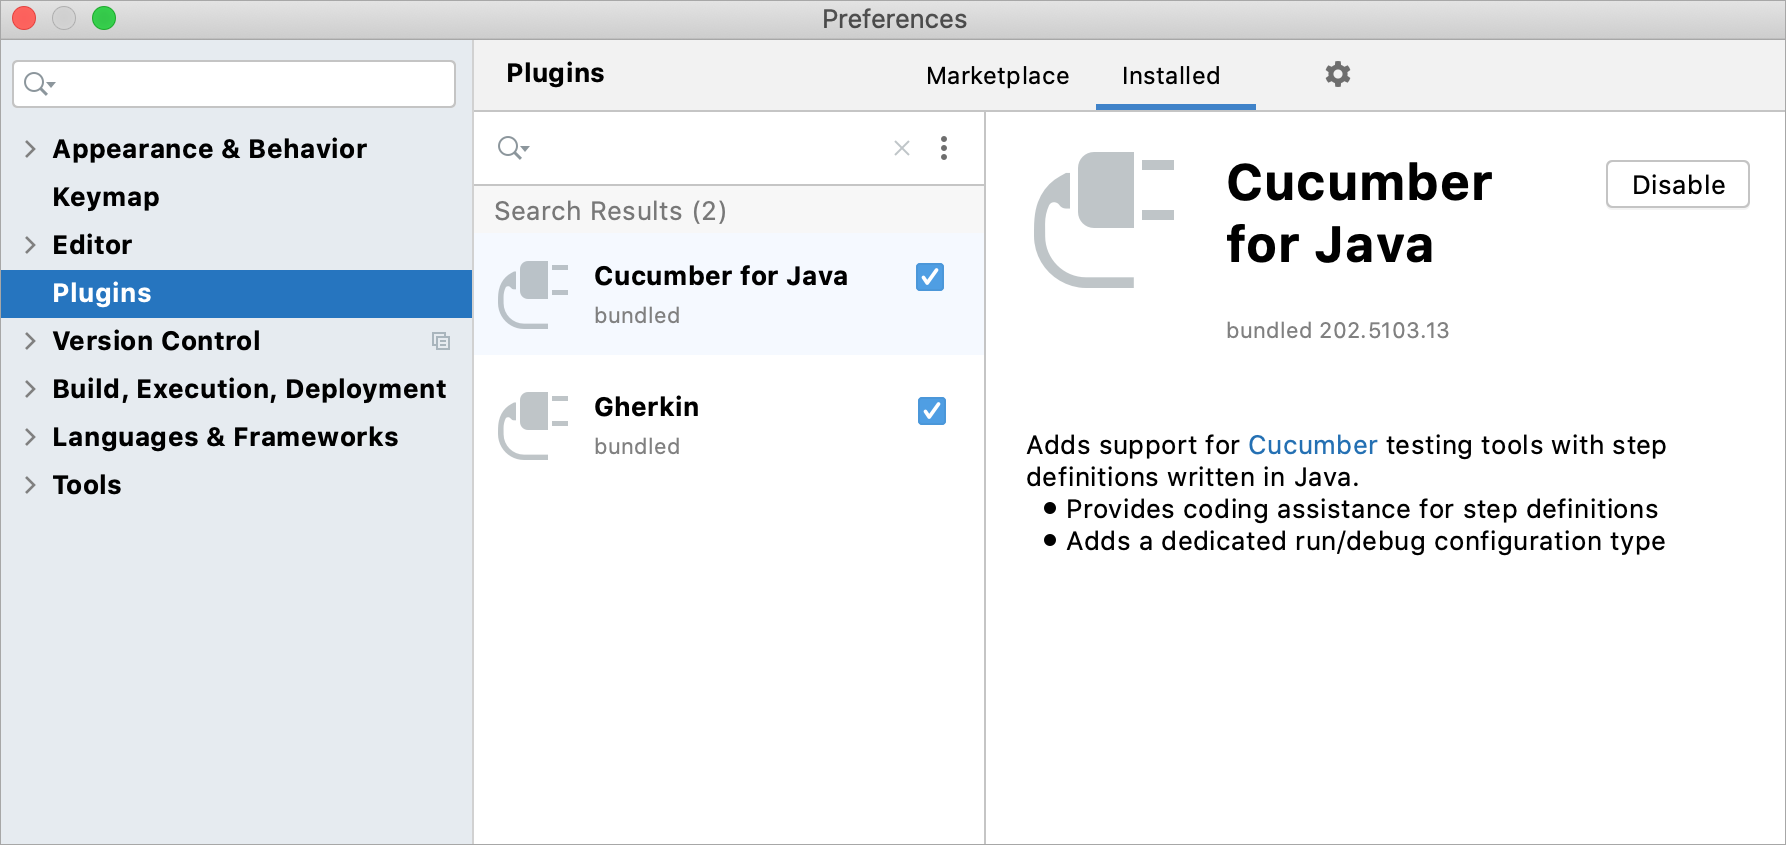
In IntelliJ Ultimate, the required plugins are bundled and enabled by default. However, we recommend you to make sure that they are switched on.
In IntelliJ Community, the necessary plugins are not bundled, that is why you need to install and enable them.
- Press CtrlAlt0S to open the IDE settings and then select Plugins.
- Switch to the Installed tab and make sure that the following plugins are enabled (the plugins must be enabled in the specified order):
- Gherkin
- Cucumber for Java
- Cucumber for Groovy (optional: install this plugin if you want to create step definitions (opens new window) in Groovy)
- If the plugins are not installed, switch to the Marketplace tab, type their names in the search field in the specified order, and click Install next to each of them.
- Apply the changes and close the dialog. Restart the IDE if prompted.

# Add the Cucumber library
# IntelliJ IDEA projects
Follow these steps to add a library if you're building your project with the native IntelliJ IDEA builder:
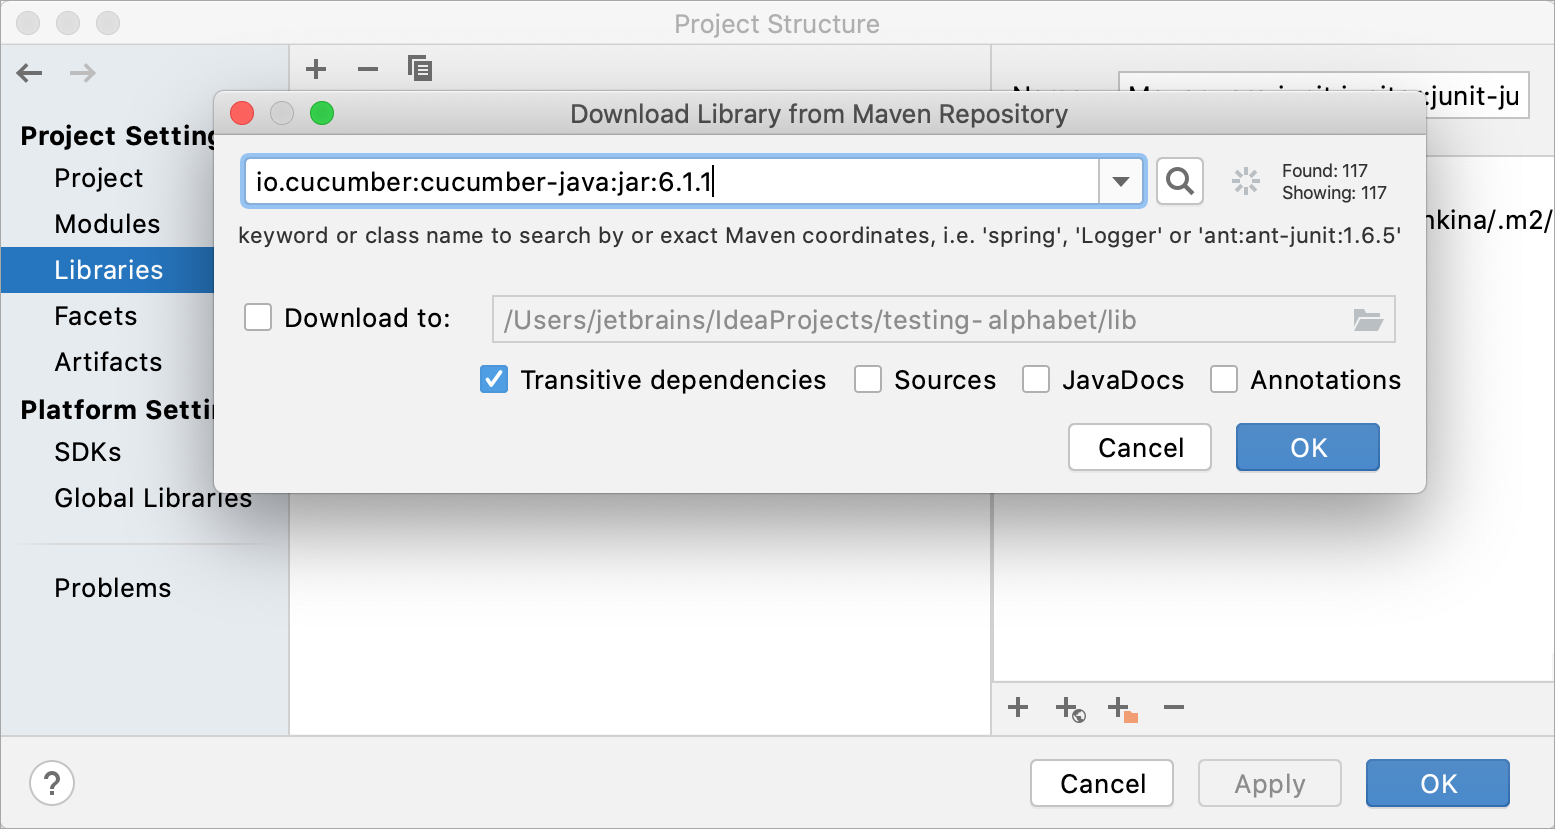
In the main menu, go to File | Project Structure (CtrlAltShift0S).
Under Project Settings, select Libraries and click
| From Maven.
In the dialog that opens, specify the artifact of the library version that you want to use in your project, for example:
io.cucumber:cucumber-java:jar:6.1.1orio.cucumber:cucumber-java8:jar:6.1.1(if you want to use lambda expressions in step definitions).Click OK.
Apply the changes and close the dialog.

# Maven projects
Follow these steps if you're using Maven in your project:
In your pom.xml, add the following dependencies (make sure to specify the latest version of Cucumber):
<dependency>
    <groupId>io.cucumber</groupId>
    <artifactId>cucumber-java</artifactId>
    <version>6.1.1</version>
    <scope>test</scope>
</dependency>
1
2
3
4
5
6Alternatively, if you want to use lambda expressions in step definitions, add:
<dependency>
    <groupId>io.cucumber</groupId>
    <artifactId>cucumber-java8</artifactId>
    <version>6.1.1</version>
    <scope>test</scope>
</dependency>
1
2
3
4
5
6Press CtrlShift0O or click
in the Maven tool window to import the changes.
For more information about working with Maven, refer to Maven dependencies (opens new window).
# Gradle projects
Use these steps if you're building your project with Gradle.
Open your build.gradle and add the following dependencies (make sure to specify the latest version of Cucumber):
For Gradle 5 and later, add:
dependencies {
  testImplementation 'io.cucumber:cucumber-java:6.1.1'
}
1
2
3Alternatively, if you want to use lambda expressions in step definitions, add:
dependencies {
  testImplementation 'io.cucumber:cucumber-java8:6.1.1'
}
1
2
3For Gradle 4.10.3 and earlier, add:
dependencies {
  testCompile 'io.cucumber:cucumber-java:6.1.1'
}
1
2
3Alternatively, if you want to use lambda expressions in step definitions, add:
dependencies {
  testCompile 'io.cucumber:cucumber-java8:6.1.1'
}
1
2
3To find out your Gradle version, run
./gradlew --versionin the Terminal (AltF12).When the dependencies are added to your build.gradle, press CtrlShift0O or click
in the Gradle tool window to import the changes.
# Run feature file
# 前置条件
Cucumber是一个通过RubyGems包管理器安装的Ruby gem
安装Ruby
sudo yum install ruby1使用Gems安装Cucumber和Allure
# 安装Cucumber。这将会从RubyGems.org下载并安装Cucumber及其所有依赖。
gem install cucumber
# 安装特定版本的Cucumber
gem install cucumber -v 'x.x.x'

# 安装Allure插件
gem install allure-cucumber
1
2
3
4
5
6
7
# 运行指定的feature文件
在Cucumber中,如果你想运行指定的feature文件,你可以在命令行中指定文件路径。例如,如果你的feature文件名为example.feature,并且放置在features目录下,你可以使用以下命令来运行它:
cucumber features/example.feature
如果你想运行指定的场景或步骤,你可以使用--name或-n选项来运行匹配给定正则表达式的场景。例如,运行名称包含"login"的场景:
cucumber features/example.feature --name "login"
或者使用简写形式:
cucumber features/example.feature -n "login"
如果你想运行多个特定的feature文件,可以一次性列出所有文件路径,用空格分隔:
cucumber features/example1.feature features/example2.feature
# 运行指定的feature文件并生成Allure报告
使用以下命令来运行指定的feature文件并生成Allure报告:
cucumber --tags @your_tag --format progress --format json:./cucumber-report.json --publish-quiet --name 'Your Scenario Name' ./path/to/your/feature/file.feature --plugin allure_cucumber
参数说明:
--tags @your_tag: 运行带有特定标签的场景。--format progress: 显示测试结果进度条。--format json:./cucumber-report.json: 将测试结果输出为JSON格式,以便生成Allure报告。--publish-quiet: 发布Allure报告时,不显示详细信息。--name 'Your Scenario Name': 运行名称为'Your Scenario Name'的场景。--plugin allure_cucumber: 生成Allure兼容的报告。
运行完成后,使用以下命令查看Allure报告:
allure serve ./allure-results
这将在浏览器中打开Allure报告。请确保你的环境中已经安装了Allure命令行工具。
# Reference
https://docs.cucumber.io/docs/guides/ (opens new window)
https://docs.cucumber.io/docs/gherkin/reference/ (opens new window)
https://github.com/cucumber/cucumber-expressions#readme (opens new window)
https://cucumber.io/docs/cucumber/configuration/?lang=java#type-registry (opens new window)
https://github.com/cucumber (opens new window)
https://github.com/cucumber/cucumber-jvm/tree/main/cucumber-junit-platform-engine (opens new window)
https://chromedriver.chromium.org/downloads (opens new window)
https://www.jetbrains.com/help/idea/2023.3/cucumber-support.html (opens new window)
