Allure自动化测试报告学习笔记
# Allure
Allure (opens new window), Automation Test Reporting Tool.
Simple. Fun. Language and Framework agnostic. Designed to create fancy and clear testing reports in minutes. Loved by the community, developed by Qameta Software & Open-source contributors.
# Allure report installation
Install from an archive (for any system)
- Make sure Java version 8 or above installed, and its directory is specified in the
JAVA_HOMEenvironment variable. - Go to the latest Allure Report release on GitHub (opens new window) and download the
allure-*.ziporallure-*.tgzarchive. - Uncompress the archive into any directory. The Allure Report can now be run using the
bin/allureorbin/allure.batscript, depending on the operating system. - Add
/path/to/allure/binto environment variables.
refer to https://allurereport.org/docs/gettingstarted-installation/ (opens new window)
# How it works

# Run tests
Run your tests as you would do normally: from the command line, from your IDE, etc.
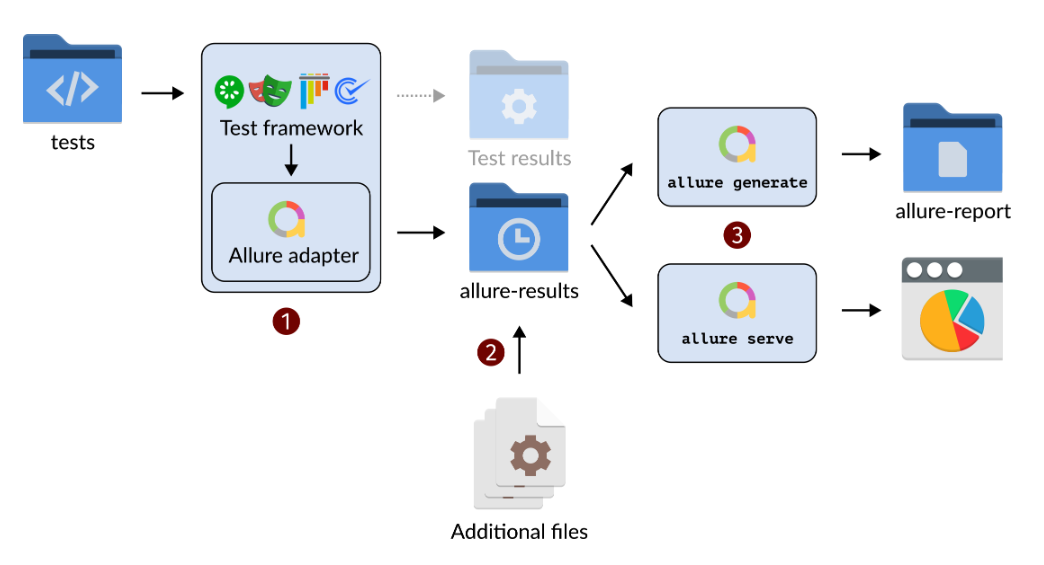
In addition to printing or saving the test results in its own format (Test results on the picture above), the Allure Report adapter receives the data from a test framework. The API used for this communication depends on the framework.
# JUnit 5
To integrate Allure (opens new window) into an existing JUnit 5 (Jupiter) project, you need to:
Add Allure dependencies to your project.
<!-- Define the version of Allure you want to use via the allure.version property -->
<properties>
  <allure.version>2.25.0</allure.version>
</properties>

<!-- Add allure-bom to dependency management to ensure correct versions of all the dependencies are used -->
<dependencyManagement>
  <dependencies>
      <dependency>
          <groupId>io.qameta.allure</groupId>
          <artifactId>allure-bom</artifactId>
          <version>${allure.version}</version>
          <type>pom</type>
          <scope>import</scope>
      </dependency>
  </dependencies>
</dependencyManagement>

<!-- Add necessary Allure dependencies to dependencies section -->
<dependencies>
  <dependency>
      <groupId>io.qameta.allure</groupId>
      <artifactId>allure-junit5</artifactId>
      <scope>test</scope>
  </dependency>
</dependencies>
2
3
4
5
6
7
8
9
10
11
12
13
14
15
16
17
18
19
20
21
22
23
24
25
26
Set up AspectJ for @Step and @Attachment annotations support.
<!-- Define the version of AspectJ -->
<properties>
  <aspectj.version>1.9.21</aspectj.version>
</properties>

<!-- Add the following options to your maven-surefire-plugin -->
<plugin>
  <groupId>org.apache.maven.plugins</groupId>
  <artifactId>maven-surefire-plugin</artifactId>
  <version>3.2.3</version>
  <configuration>
      <argLine>
          -javaagent:"${settings.localRepository}/org/aspectj/aspectjweaver/${aspectj.version}/aspectjweaver-${aspectj.version}.jar"
      </argLine>
  </configuration>
  <dependencies>
      <dependency>
          <groupId>org.aspectj</groupId>
          <artifactId>aspectjweaver</artifactId>
          <version>${aspectj.version}</version>
      </dependency>
  </dependencies>
</plugin>
2
3
4
5
6
7
8
9
10
11
12
13
14
15
16
17
18
19
20
21
22
23
Designate a location for Allure results storage.
Allure, by default, saves test results in the project's root directory. However, it is recommended to store your test results in the build output directory.
To configure this, create an allure.properties file and place it in the test resources directory of your project, which is typically located at src/test/resources:
allure.results.directory=target/allure-results
Run tests
mvnw verify

# Execute all test files
mvn test

# Execute the given test file
mvn clean test -Dtest=xxxx
2
3
4
5
6
7
More detail see https://allurereport.org/docs/junit5/ (opens new window)
# Cucumber-JVM
To integrate Allure (opens new window) into an existing Cucumber-JVM project, you need to:
- Add Allure dependencies to your project.
- Activate the Allure Cucumber-JVM plugin.
- Set up AspectJ for
@Stepand@Attachmentannotations support. - Designate a location for Allure results storage.
The specific implementation of these steps varies based on how your Cucumber-JVM is set up. Cucumber-JVM can be used with three different types of runners:
- JUnit Platform (recommended)
- TestNG
- JUnit 4 (deprecated)
JUnit Platform is the recommended runner for Cucumber-JVM tests. Here is an example:
Add Allure dependencies to your project.
<!-- Define the version of Allure you want to use via the allure.version property -->
<properties>
  <allure.version>2.24.0</allure.version>
</properties>

<!-- Add allure-bom to dependency management to ensure correct versions of all the dependencies are used -->
<dependencyManagement>
  <dependencies>
      <dependency>
          <groupId>io.qameta.allure</groupId>
          <artifactId>allure-bom</artifactId>
          <version>${allure.version}</version>
          <type>pom</type>
          <scope>import</scope>
      </dependency>
  </dependencies>
</dependencyManagement>

<!-- Add necessary Allure dependencies to dependencies section -->
<dependencies>
  <dependency>
      <groupId>io.qameta.allure</groupId>
      <artifactId>allure-cucumber7-jvm</artifactId>
      <scope>test</scope>
  </dependency>
  <dependency>
      <groupId>io.qameta.allure</groupId>
      <artifactId>allure-junit-platform</artifactId>
      <scope>test</scope>
  </dependency>
</dependencies>
2
3
4
5
6
7
8
9
10
11
12
13
14
15
16
17
18
19
20
21
22
23
24
25
26
27
28
29
30
31
Activate the Allure Cucumber-JVM plugin.
Create a src/test/resources/junit-platform.properties file and add property cucumber.plugin with value io.qameta.allure.cucumber7jvm.AllureCucumber7Jvm:
#junit-platform.properties
cucumber.plugin=io.qameta.allure.cucumber7jvm.AllureCucumber7Jvm
2
Set up AspectJ for @Step and @Attachment annotations support.
Designate a location for Allure results storage.
More detail refer to https://allurereport.org/docs/cucumberjvm/ (opens new window)
# pytest
Install the Allure pytest adapter
pip install allure-pytest
Run tests
pytest
pytest --clean-alluredir
2
This will save necessary data into allure-results or other directory, according to the settings. , see Configuration (opens new window).
Here's an example of a pytest.ini configuration file:
[pytest]
addopts = --clean-alluredir
        --alluredir allure-results
2
3
More detail see https://allurereport.org/docs/pytest/ (opens new window)
# Generate HTML report
Generate the HTML report by using one of the two Allure command-line commands.
allure generateprocesses the test results and saves an HTML report into the specified directory (allure-reporton the picture above). To view the report, use theallure opencommand.
Use this command if you need to save the report for future reference or for sharing it with colleagues.
allure servecreates the same report asallure generatebut puts it into a temporary directory and starts a local web server configured to show this directory's contents. The command then automatically opens the main page of the report in a web browser.
Use this command if you need to view the report for yourself and do not need to save it.
