Zookeeper学习笔记
# zookeeper 简介
zookeeper,基于观察者模式设计的分布式协调框架,负责存储和管理大家关心的数据,核心是文件系统+通知机制。
zookeeper有几个重要的概念:
数据结构:文件系统的数据结构,每个节点称为一个ZNode,每个ZNode通过其路径进行唯一标识,默认能够存储1M数据。
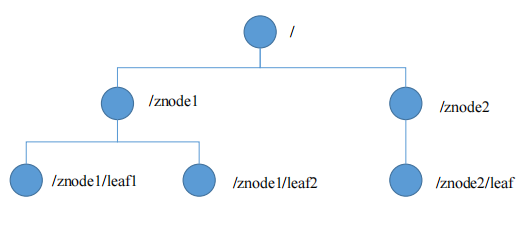
节点类型:持久节点、临时节点、顺序节点。
工作状态:
- LOOKING:竞选状态。寻找Leader中
- FOLLOWING:跟从状态。当前服务器角色是Follower
- LEADING:领导状态。当前服务器角色是Leader
- OBSERVING:观察状态。当前服务器角色是Observer
选举机制:全新集群选举和非全新集群选举
全新集群选举,是指服务器集群首次启动时的选举,服务器能否成为Leader跟myid的数值有关,遵循过半机制。
非全新集群选举,是指服务器集群在运行期间,如果Leader宕机了,Follower重新选举Leader。依次比较逻辑时钟(选举次数)、数据ID(反应保存数据的新旧程度)、服务器ID(myid)。
写入数据:同样遵循“过半机制”。任意一台服务器收到客户端写请求,都会将写请求转发给Leader,由Leader发起写提议,接着Leader和Follower们进行写操作,Follower写完后将结果返回Leader,如果超过一半机器写成功,则Leader认为写成功,并且将结果知会转发请求的源机器,源机器再返回客户端。
监听原理:主线程(Main)创建ZK客户端,这时会创建两个线程,一个线程负责网络连接通信(connet),两个线程负责监听(listener)。通过connet将注册的监听事件发给ZK,ZK监听到数据或路径有变化时通知listener,listener调用process方法。
# zookeeper 安装部署
zookeeper安装部署比较简单。将压缩包解压,然后修改下配置文件即可,配置文件需要将 conf/zoo_sample.cfg复制并重命名为 conf/zoo.cfg 。
安装部署有三种方式:本地模式(单机)、伪分布式模式(单机不同端口)、分布式模式。
本地模式安装部署
# 解压安装包
tar -zxf apache-zookeeper-3.6.2-bin.tar.gz
# 进入解压目录
cd apache-zookeeper-3.6.2-bin

# 创建数据目录
mkdir data

# 进入配置目录
cd conf
# 复制配置文件
cp zoo_sample.cfg zoo.cfg

# 修改配置文件
vi zoo.cfg
2
3
4
5
6
7
8
9
10
11
12
13
14
15
zoo.cfg
# The number of milliseconds of each tick
# 通信心跳数,单位毫秒。用于心跳机制,服务器之间或服务器与客户端之间维持心跳的时间间隔
tickTime=2000

# The number of ticks that the initial
# synchronization phase can take
# 集群中LF初始连接时的通信时限 = tickTime * initLimit
initLimit=10

# The number of ticks that can pass between
# sending a request and getting an acknowledgement
# 集群中LF最大同步通信时限 = tickTime * syncLimit
syncLimit=5

# the directory where the snapshot is stored.
# do not use /tmp for storage, /tmp here is just
# example sakes.
# 数据快照存储目录
dataDir=/opt/zookeeper/apache-zookeeper-3.6.2-bin/data

# the port at which the clients will connect
# 客户端连接端口
clientPort=2181

# the maximum number of client connections.
# increase this if you need to handle more clients
#maxClientCnxns=60

#
# Be sure to read the maintenance section of the
# administrator guide before turning on autopurge.
#
# http://zookeeper.apache.org/doc/current/zookeeperAdmin.html#sc_maintenance
#
# The number of snapshots to retain in dataDir
#autopurge.snapRetainCount=3

# Purge task interval in hours
# Set to "0" to disable auto purge feature
#autopurge.purgeInterval=1

## Metrics Providers
#
# https://prometheus.io Metrics Exporter
#metricsProvider.className=org.apache.zookeeper.metrics.prometheus.PrometheusMetricsProvider
#metricsProvider.httpPort=7000
2
3
4
5
6
7
8
9
10
11
12
13
14
15
16
17
18
19
20
21
22
23
24
25
26
27
28
29
30
31
32
33
34
35
36
37
38
39
40
41
42
43
44
45
46
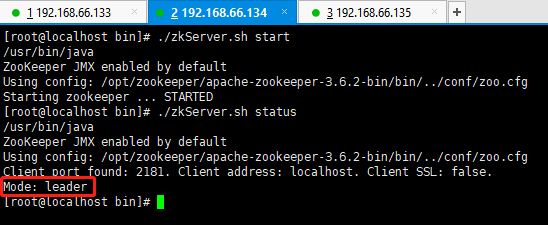
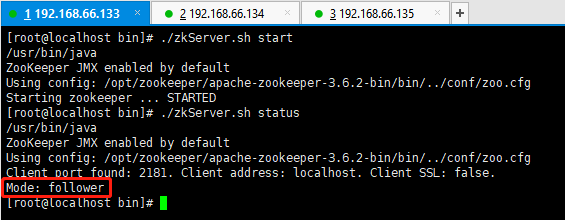
分布式模式安装部署,集群模式服务器数量一般是奇数!
在 dataDir=/opt/zookeeper/apache-zookeeper-3.6.2-bin/data目录下新建文件 myid,并写入一个数字。该数字用于选举机制,一般来说,数字越大的,成为Leader的概率越高。
cd /opt/zookeeper/apache-zookeeper-3.6.2-bin/data
touch myid
vi myid
2
3
修改 zoo.cfg 增加如下内容:
# 集群配置,格式:server.A=B:C:D
# A表示myid里面的数字
# B表示服务器ip
# C表示LF交换信息的端口号
# D表示L宕机了,F们需要重新选举时通信的端口号
server.1=192.168.66.133:2888:3888
server.2=192.168.66.134:2888:3888
server.3=192.168.66.135:2888:3888
2
3
4
5
6
7
8
建立主机与IP之间的映射关系
vim /etc/hosts
127.0.0.1   localhost localhost.localdomain localhost4 localhost4.localdomain4 192.168.66.134
::1         localhost localhost.localdomain localhost6 localhost6.localdomain6 192.168.66.134
2
配置集群时,记得建立主机与IP之间的映射关系,并关闭防火墙或者开放对应端口号!!!
# zookeeper 基本操作
cd bin

# 查看状态
./zkServer.sh status

# 启动服务
./zkServer.sh start

# 重启服务
./zkServer.sh restart

# 停止服务
./zkServer.sh stop

# 连接客户端
./zkCli.sh
./zkCli.sh -server ip:port

# 退出客户端
quit

# 创建节点
create [-s] [-e] [-c] [-t ttl] path [data] [acl]

# 修改节点
set [-s] [-v version] path data

# 删除节点
delete [-v version] path
deleteall path [-b batch size]

# 获取节点
get [-s] [-w] path

# 列出节点
ls [-s] [-w] [-R] path
2
3
4
5
6
7
8
9
10
11
12
13
14
15
16
17
18
19
20
21
22
23
24
25
26
27
28
29
30
31
32
33
34
35
36
# 参考资料
zookeeper官网 (opens new window)